DICOM Routing using Capacitor

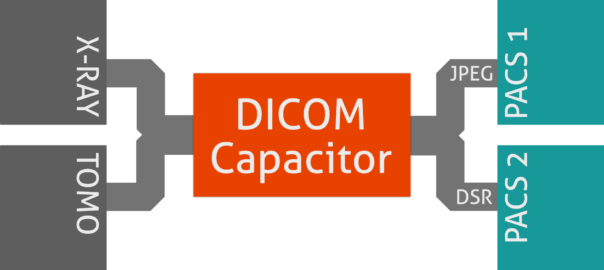
Conditional routing and compression to multiple PACS.

DICOM Capacitor is a store-and-forward DICOM router, and conditional routing is among the simplest of its many features.

Here, we show an example of a configuration that makes Capacitor:

  • Receive studies from any modality,
  • Compress images on the way to a primary PACS, and
  • Re-route DICOM SR instances to a secondary PACS.

Getting Started

To begin, collect information about our PACS’.

For this example, we have gathered the following:

AE TitleIP AddressPortPreferred Transfer Syntax
Primary PACSIMAGEPACS192.168.1.200104JPEG 2000 Lossless
Secondary PACSREPORTPACS192.168.1.201104Any

We’re ready to install.

Install Capacitor

  1. Click this link to download the latest evaluation of DICOM Capacitor:
    https://store.fluxinc.ca/files/DCP/latest
  2. Run the installer and complete the installation process.
  3. Once finished, open DICOM Capacitor Control using your start menu, and, if needed, follow the prompts to obtain an evaluation license.
  4. Start, and then stop, the “DICOM Capacitor” service using either the Control applet, the Windows Services snap-in, or by running the following commands:
$ net start DICOMCapacitorService
$ net stop DICOMCapacitorService

Close DICOM Capacitor Control if it’s still open because all further steps will be performed outside the user interface.

Configure Capacitor

All Capacitor configuration files live in the %ProgramData%\Flux Inc\DICOM Capacitor folder.

Here are the three files we will be editing:

  • config.yml, which defines Capacitor’s operational settings, and
  • nodes.yml, which defines all destination (and source) nodes
  • routings.yml, which defines the routing rules

Set Capacitor Defaults

  1. Open config.yml in your YAML text editor — we recommend Atom, or Visual Studio Code.
  2. Confirm the value of scpPort:

    scpPort: 1040

    This is the port on which Capacitor will accept C-STORE (and C-ECHO) associations.
  3. Turn on the routing module by adding “route” the filters setting:

    filters: route

3. Finally, save and close config.yml.

Define the Two Nodes

Next, we define our destination nodes.

  1. First, open nodes.yml in your YAML text editor.
  2. Replace the contents of nodes.yml with:
# Primary PACS
- NodeRole: Storage
  AeTitle: IMAGEPACS
  HostName: 192.168.1.200
  Impersonate: true
  Port: 104
  TransferSyntax: JPEG2000Lossless
  MinimumLineSpeed: 500

# Secondary PACS
- NodeRole: Storage
  AeTitle: REPORTPACS
  HostName: 192.168.1.201
  Impersonate: true
  Port: 104
  MinimumLineSpeed: 500

According to this node definition file, Capacitor will:

  • Listen for C-ECHO and C-STORE associations on port 1040.
  • Respond and automatically route to AE titles IMAGEPACS and REPORTPACS1.
  • Compress all instances bound for IMAGEPACS to JPEG 2000 Lossless.
  • Impersonate, i.e., use the sending modality’s own AE title, when forwarding to these destinations.

1 Capacitor will also respond to DCP_IMAGEPACS, and DCP_REPORTPACS in the same way.

All that remains is for us to configure our routing rules.

Define DICOM Routing Rules

All route definitions live in a file called routings.yml.

  1. Create routings.yml if it does not already exist, and open it in your YAML editor.
  2. Paste in the following content and save the file:
---
- AeTitles:
    - IMAGEPACS
  Conditions:
    - Tag: 0008,0016
      MatchExpression: ^1\.2\.840\.10008\.5\.1\.4\.1\.1\.88\.[\d]{1,2}$
  Actions:
    - Description: Re-route to REPORTPACS
      Type: add_destination
      Target: REPORTPACS
      RemoveOriginal: true

This definition tells Capacitor’s routing module to:

  • Consider only instances bound for IMAGEPACS
  • Determine if the SOP Class UID (0008,0016) matches the regular expression ^1.2.840.10008.5.1.4.1.1.88.[\d]{1,2}$, which matches all DICOM SR types
  • If so, then add the destination REPORTPACS, which is defined in our nodes.yml file, and
  • Remove the original route for this instance

We’re ready to test.

Start Capacitor and Inspect the Logs

  1. Start the DICOM Capacitor service using the Windows Services snap-in, or:

    $ net start DICOMCapacitorService
  2. Next, open and inspect
    %ProgramData%\Flux Inc\DICOM Capacitor\logs\capacitor_service.log

The last few lines in this log should confirm that Capacitor is running and accepting connections on behalf of our two nodes.


Comment below with any questions, and don’t hesitate to reach out for our help!

Installing and activating our gateways

All of our gateway applications share large parts of their user interface. Installation, therefore, is pretty similar from product to product. This post describes how to install, configure, and activate the Cardiology Gateway. We will use the example of storage into Philips Xcelera, but the same process is applicable for other destinations, such as AGFA Heartlabs, GE Enterprise Archive, and other compatible destinations.

Installation

Firstly, download the gateway of your choice from our website. The easiest way to do this is to visit our store, here:

https://store.fluxinc.ca/files

Then click on the version you would like to download:

Download Cardiology Gateway

You will then be asked to fill in a few details. Please make sure that your email address is correct, since this is where your download link will be sent.

Once downloaded, double-click to run the installer:

Cardiac Gateway installer

Follow the prompts to complete the installation, and then make sure to Start the Control Center at the end:

Start control center

And that’s it, the application is installed.

By the way, upgrades are the same process, and take just minutes to complete.

The Control Center

This is the gateway Control Center:

Cardiac Control Center

This part of the application looks very similar to the Radiology gateway, Combobulator and Shrinkinator products.

  • The Service panel lets you see if the gateway is running, and to start and stop it.
  • The Connection Check panel allows you to verify that you have connectivity to the ultrasound cart. This part does not need to be filled
  • The PACS panel is where you enter the connection parameters required to reach the PACS.
  • And, finally, the Gateway panel contains settings relating to gateway operation.

A running application log appears beneath the Gateway panel, and should be examined to confirm operation, and check for errors.

Configuration

Firstly, fill in the PACS information. In this case, we are connecting to an Xcelera R3.1 PACS at IP 192.168.1.100, port 104, and the AE title of INTURISPRO_SCP:

Control center short

It’s usually best to use the exact same settings that you see on the ultrasound cart, but some PACS require that you use a dedicated AE title and port (we’re looking at you, Heartlabs!).

Press Echo to test the connection. If you do not receive confirmation of a successful test, then please make sure that all of the parameters are correct, and that the PACS is configured properly to accept your connection.

Next, select the destination profile. This will ensure that the data presented by the gateway will be readable by the PACS:

Select gateway profile

Here, we’ve selected the SC2000 to Xcelera profile.

Choose a port number on which the gateway should listen for connections, and then choose the AE titles it should use. The gateway is capable of mimicking the AE titles of both the cart and the PACS, so that each thinks it’s communicating with the other, but in this case we will be creating a distinct DICOM entity, and so we are leaving the values at DICOM_GATEWAY:

Gateway connection parameters

Make a note of the IP Address, AE titles, and port. You will need these at the cart.

Configuring the Ultrasound Cart

Next, the ultrasound cart needs to be configured to send the DICOM SR segment through the gateway. To do this, please:

  1. Add a new DICOM destination on the cart.
  2. Configure this destination with the IP address, AE title, and Port of the gateway. In our example, these would be 172.30.0.154, port 1104 and AE title DICOM_GATEWAY.
  3. Disable transmission of images, multi-frame images, and RAW data to the gateway. Enable transmission of the SR segment to the gateway.
  4. Disable transmission of the SR segment directly from the ultrasound cart to the PACS.

Once you have completed these changes, you may have to restart the Ultrasound cart.

Activation

Lastly, you need to activate the gateway. To do this, please open the activation window through the Tools menu:

Accessing the activation menu

Once there, you can get your Request Code, please copy this into the clipboard, and visit our store to retrieve an Activation Code:

https://store.fluxinc.ca/activate_product

On the activation page, please enter your request code, and a friendly label for the location — this will help you identify and manage your license online:

Store activation request

Press Activate, and you will be presented with an Activation Code. Copy and paste the activation code back into the Control Center Activation Window and click Activate:

Enter activation code

Press Start at the top of the Control Center, and then you’re ready to start translating measurements.

Send something from the cart and watch the log fly by!

Note that we offer temporary licenses for use during sales. Please contact us with the details of your installation and we will get in touch with you right away.